Host Management (The Vault)
Master the art of organizing infrastructure with the Netcatty Vault
The Vault is the heart of Netcatty. It is not merely a "list of saved servers"; it is a sophisticated, object-oriented database designed to manage the complexity of modern infrastructure. Whether you manage a focused cluster of 5 Raspberry Pis or a distributed fleet of 5,000 enterprise nodes, the Vault scales to match your mental model.
In this deep dive, we will explore every facet of the Vault: from basic connectivity to advanced organizational strategies, bulk operations, and data portability protocols.
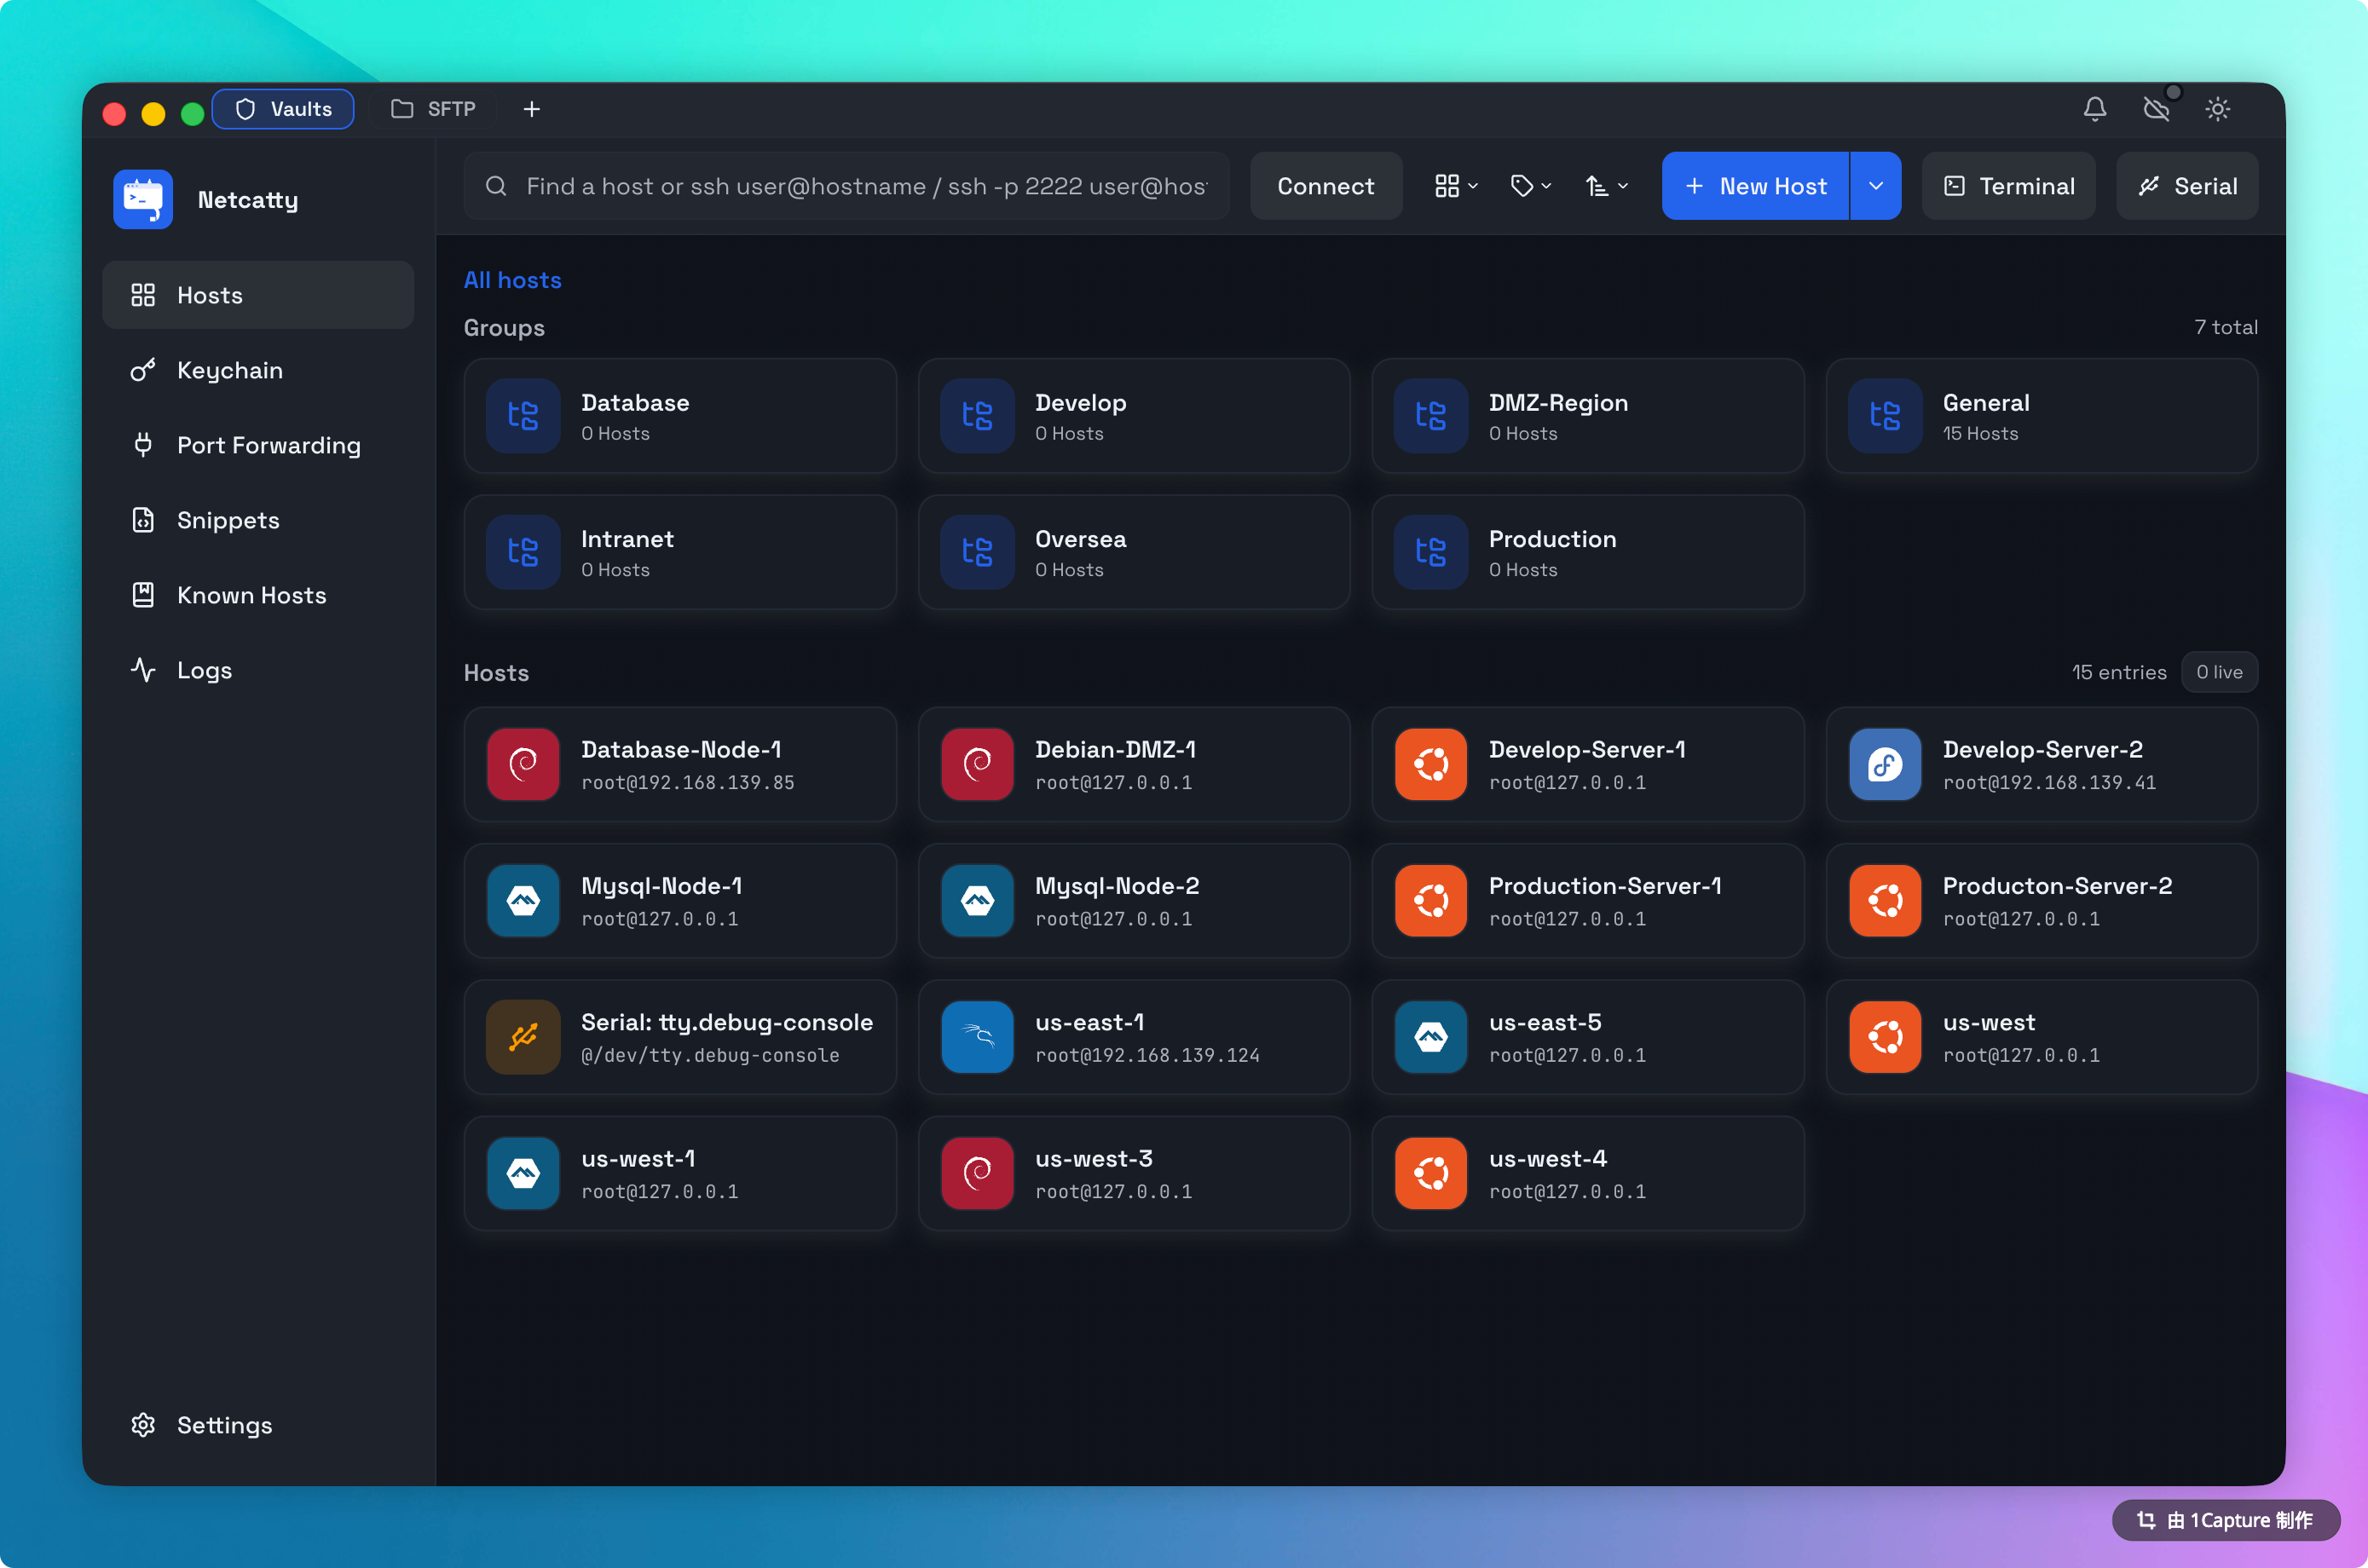
Netcatty offers two distinct specialized views for your Vault, tailored to different cognitive workflows. You can toggle between them instantly using the view switcher in the top toolbar.
- Card Architecture: Each host is represented as a large, clickable card.
- OS Identity: Netcatty automatically detects the operating system of your remote host (e.g., Ubuntu, CentOS, Arch, Debian) and stamps the card with the official branding logo and primary color. This allows you to identify your infrastructure types at a glance.
- Connection Summary: The vault header shows a live count of active terminal sessions across your entire infrastructure.
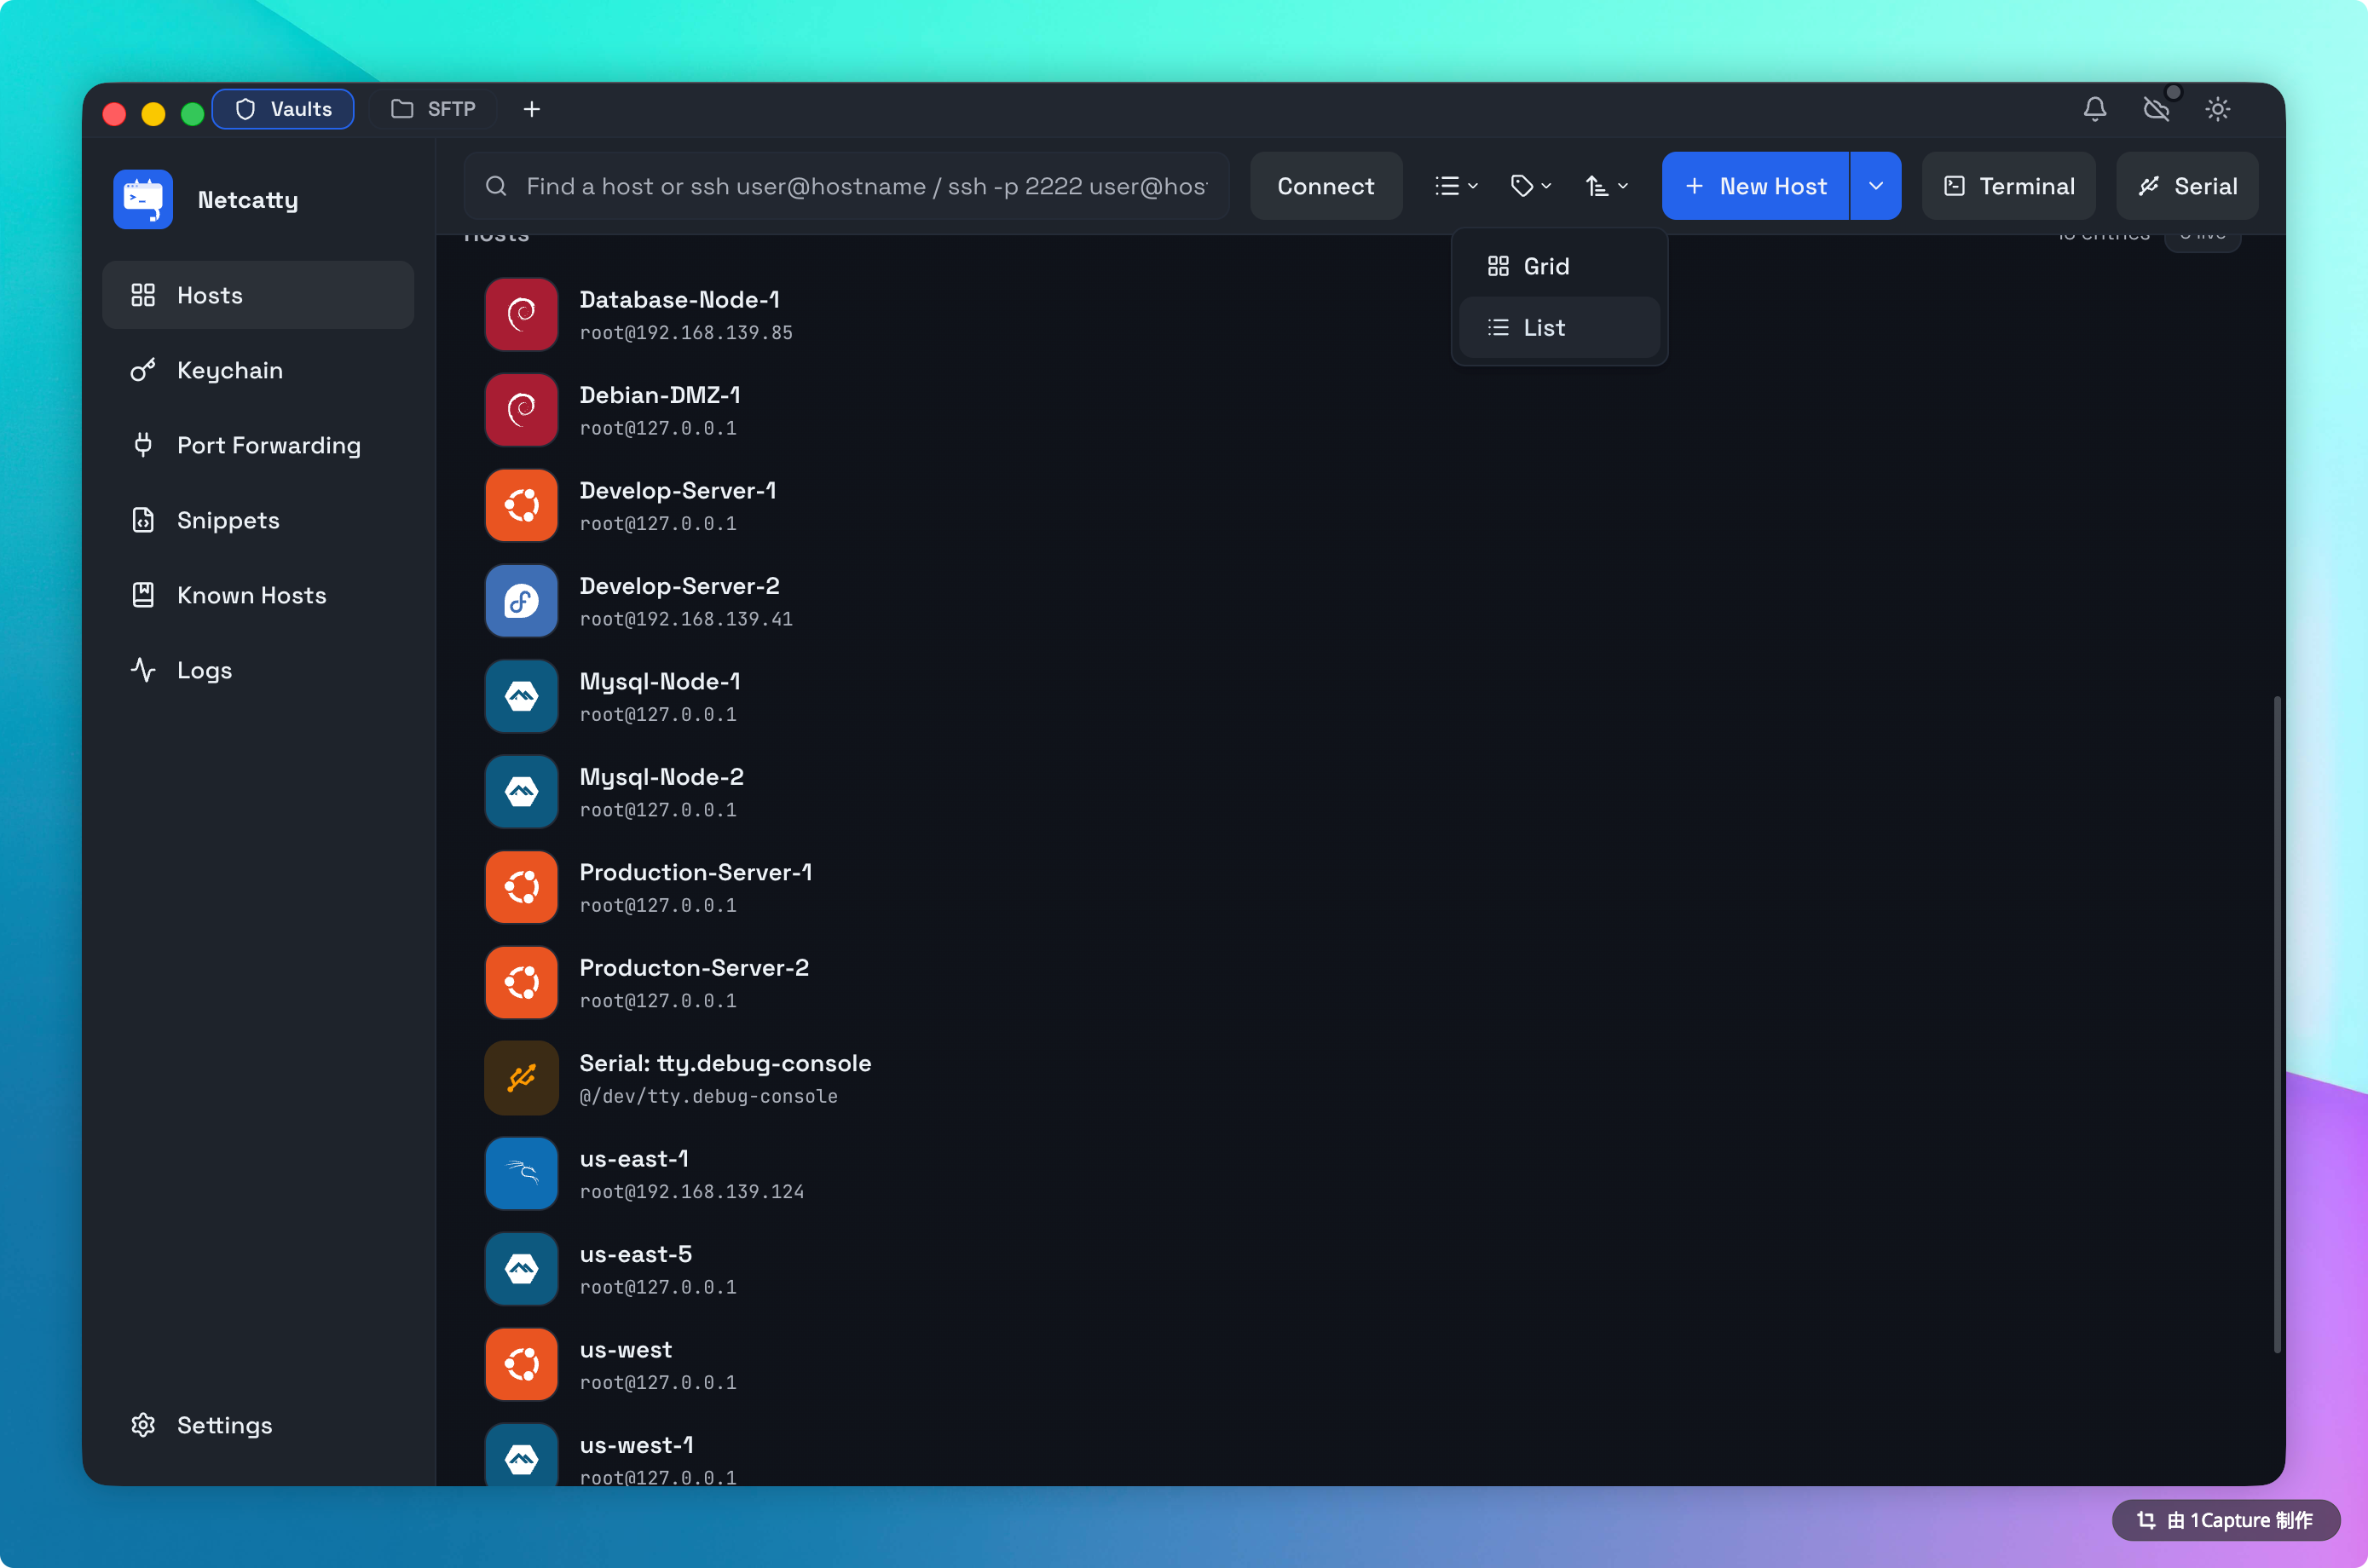
2. List View (Data Density)
List View is designed for Management and Search. When you need to find "that one server on subnet 10.0.1.x" or perform bulk edits on 50 nodes, switch to List View.
- Sortable Columns: Click headers to sort by Label, Hostname (IP), Protocol, or Tags.
- Inline Actions: Hover over any row for one-click access to specific actions like "Connect via SFTP", "Duplicate", or "Copy IP".
- Compact Density: Displays up to 25 hosts per screen height, maximizing information density.
Organization Strategies
A disorganized Vault leads to operational mistakes (like rebooting Production instead of Staging). Netcatty provides two powerful axes of organization: Hierarchy (Groups) and Context (Tags).
The Hierarchical Model: Nested Groups
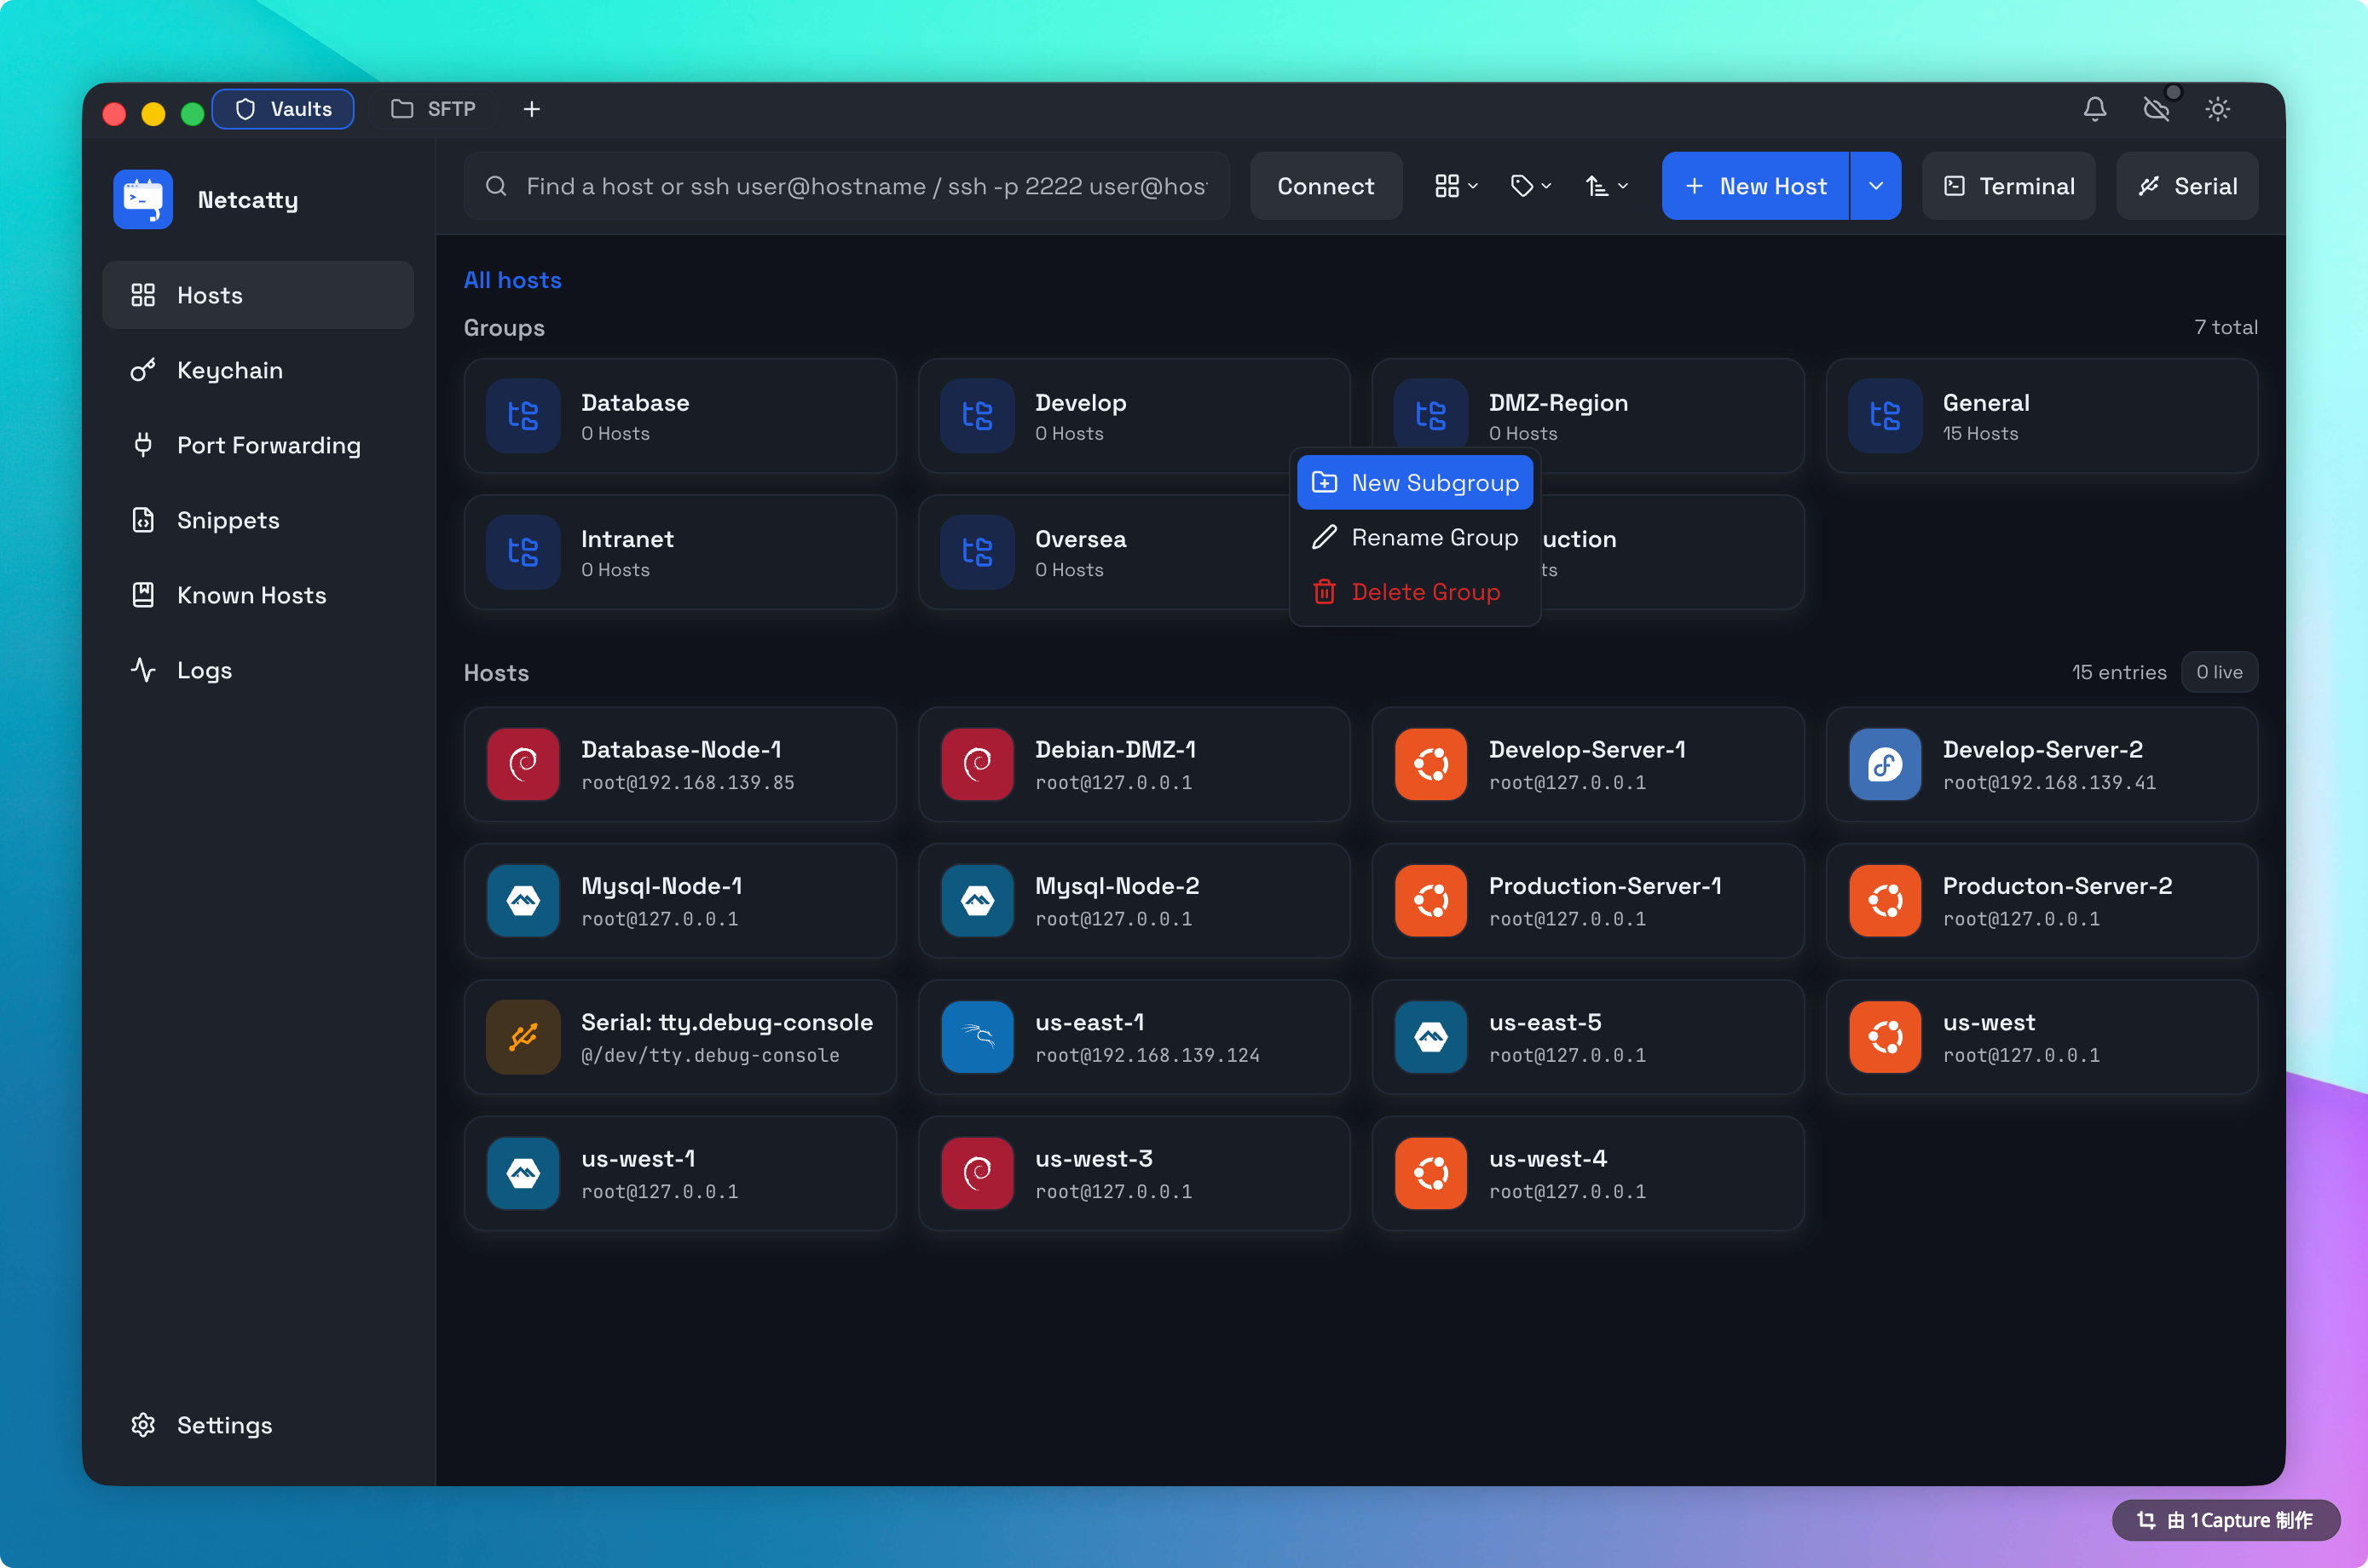
Netcatty supports Infinite Nesting of groups. This allows you to mirror your physical or logical infrastructure topology exactly.
Common Grouping Patterns:
- Geographical:
Start -> Asia -> Tokyo -> Availability Zone A - Project-Based:
Start -> Client X -> Production -> DB Cluster - Role-Based:
Start -> Load Balancers -> Nginx
To create a group, right-click anywhere in the whitespace and select New Group, or drag one host onto another to auto-create a cluster.
The Contextual Model: Tags
While Groups are rigid (a host can only be in one group), Tags are fluid. You can assign unlimited tags to a host to represent cross-cutting concerns.
Effective Tagging Strategies:
- Environment:
#prod,#staging,#dev,#dr-site - Role:
#db,#web,#worker,#redis - OS Family:
#linux,#bsd,#windows - Maintenance Status:
#needs-patching,#do-not-reboot
The Power of Tag Search: Clicking a tag in the sidebar instantly filters the entire Vault (across all groups) to show only matching hosts. This is invaluable for tasks like: "Show me every Ubuntu server in Production that needs patching."
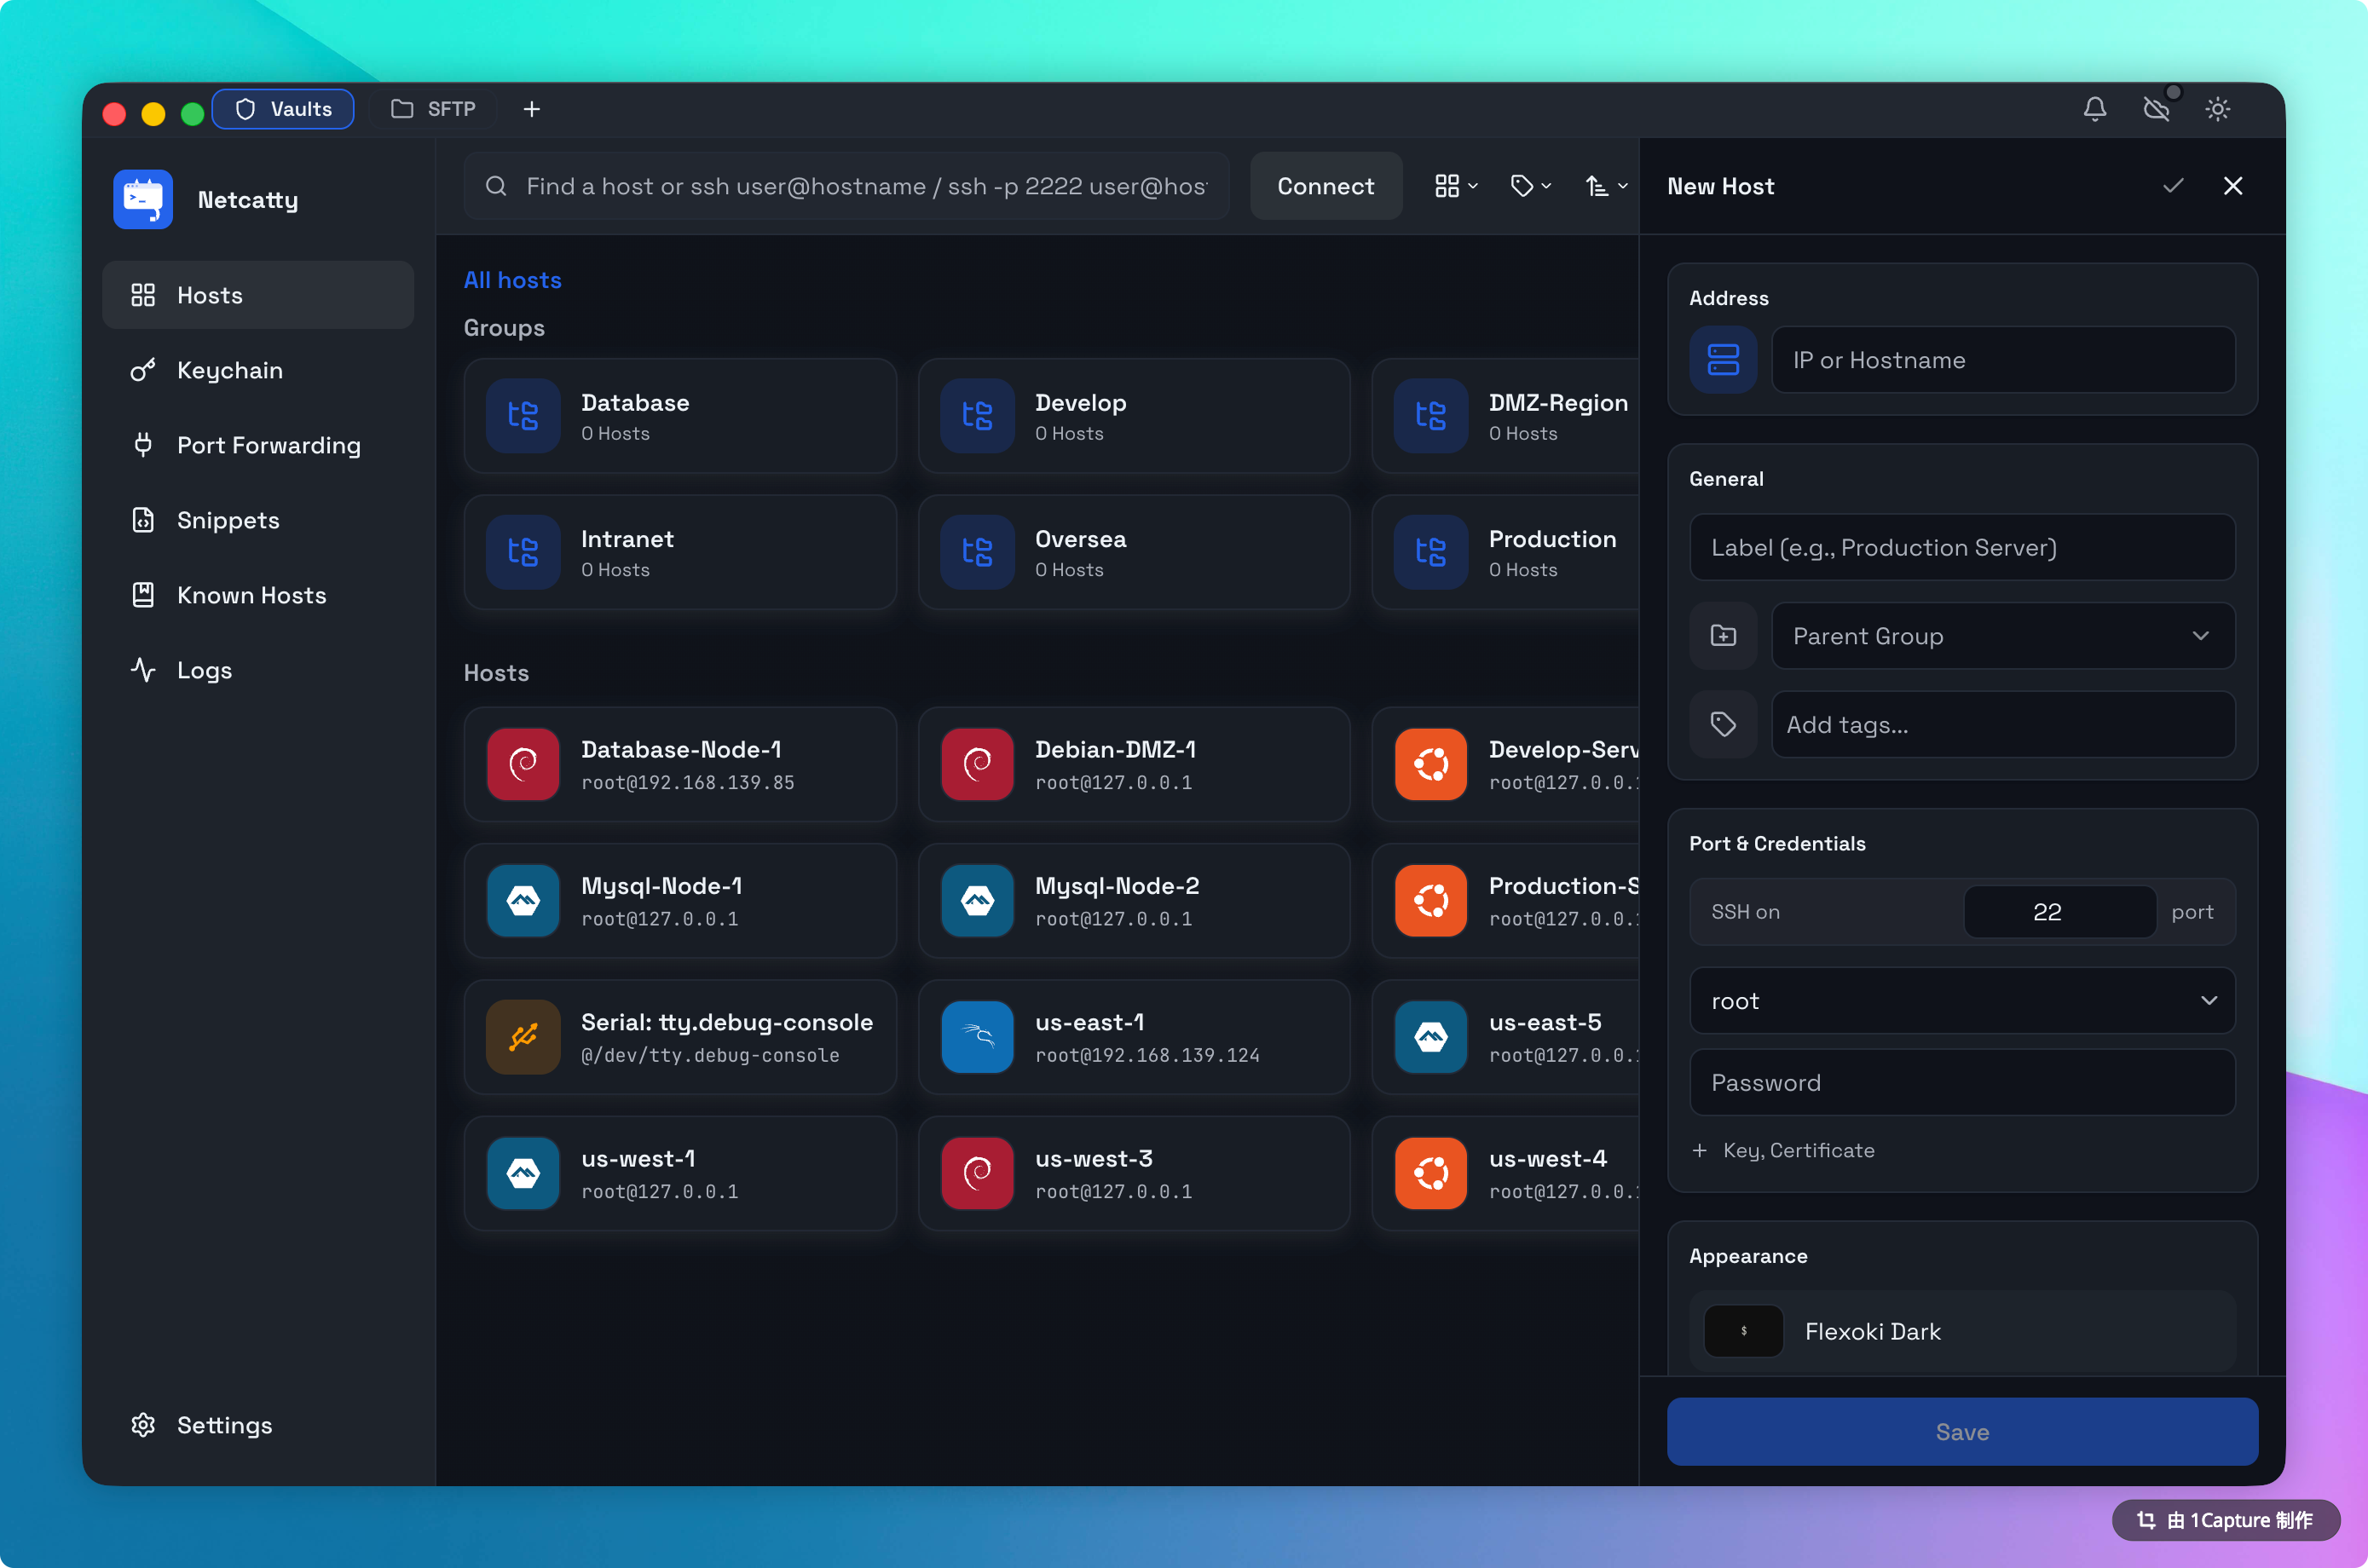
The Host Entity
When you click New Host, you are creating more than just an ssh user@host config. The Host Entity in Netcatty encapsulates the full lifecycle of the connection.
1. General Configuration
- Label: The human-readable name (e.g., "Primary Gateway").
- Address: DNS name (FQDN) or IP Address.
- Port: Defaults to 22.
- Icon: By default, set to "Auto-Detect". Netcatty queries
/etc/os-releaseupon first connection to lock in the correct icon. You can override this manually if you want a visual distinction (e.g., using the "Red Hat" icon for mission-critical servers regardless of actual OS).
2. Authentication (Identity Linking)
- Manual: You enter a username/password/key specific to this single host. Good for one-offs.
- Identity (Recommended): You link an Identity. This is a pointer reference.
- Why this matters: If you rotate your SSH key, update the Identity once, and all 50 hosts linked to it are updated instantly.
3. Advanced Settings
- Environment Variables: Inject custom
envvars into the session (e.g.,export CLUSTER_ID=us-east-1). - Startup Script: A specialized snippet that runs immediately after connection. Great for firing up
tmuxor sourcing a virtual environment. - Keep-Alive: Configures the
ServerAliveIntervalto prevent firewalls from dropping idle connections.
Bulk Operations
Managing scale requires bulk tools. Netcatty allows you to manipulate groups of hosts simultaneously.
- Multi-Select: Hold
Cmd(Mac) orCtrl(Win) to select specific hosts, orShiftto select a range. - Context Menu: Right-click the selection to:
- Connect All: Opens X terminals in split view relative to the selection count.
- Tag: Add/Remove tags from all selected items.
- Move: Drag the entire selection to a new Group.
- Delete: (With a "Type to Confirm" safety prompt).
Mass Connect Warning
Opening 10+ SSH connections simultaneously can trigger intrusion detection systems (IDS) or rate limits on the remote side. Proceed with caution.
Data Portability (Import/Export)
Your data belongs to you. Netcatty uses a transparent JSON schema for all configuration data.
Exporting
Go to Settings > Data > Export Vault. You can choose:
- Full Backup (Encrypted): Includes Host details AND sensitive secrets (passwords/keys), encrypted with your Master Password.
- Sanitized Export (JSON): Exports structure (Groups, Hosts, Tags, IPs) but strips all credentials. Perfect for sharing a configuration with a new team member.
Importing
Netcatty supports importing from:
- Netcatty JSON: Restores a backup.
- Standard SSH Config: Parses
~/.ssh/configand attempts to convertHostblocks into Netcatty entities. - CSV: Generic CSV importer for migration from spreadsheet-based inventories.
Search Syntax
The global search bar (Cmd+K or top input) is powerful. It indexes:
- Labels
- Hostnames / IPs
- Tags
- Usernames
Fuzzy Matching:
Typing prod web will find a host labeled "Production Nginx Webserver". You don't need exact phrasing.
Troubleshooting
"Host Icon is Generic Tux"
If Netcatty displays the generic Linux penguin instead of specific branding:
- Connect to the host once. The detection runs post-connection.
- Ensure the user has read permissions on
/etc/os-releaseor/etc/issue. - If it's a BSD system or exotic proprietary UNIX, auto-detection might fail. Set the icon manually in Host Settings.
"Connection Refused"
- Check if the IP is reachable via
ping. - Verify if you need a Jump Host to reach this network segment.
- Check if a firewall (UFW/iptables) is blocking your IP.